
Last Tuesday, my PC completely froze while I had only opened a recent game and a handful of browser tabs. I have 16 GB of RAM, the processor was up to the task, and yet the system collapsed. When physical memory reaches its limit, applications crash.
Windows has a safety net to prevent this kind of lock-up: virtual memory. It is simply a hidden file on your hard drive that takes over when your RAM modules run out of room.
By default, Windows 11 calculates the size of this file automatically. The problem is that it often sets it too small. If you are experiencing unexplained slowdowns with demanding software or games, the quickest way to stabilize your PC is to open the system settings and increase this limit manually.
Your components will not change, but your computer will have enough headroom to run demanding programs without struggling. Here are the exact settings you need to adjust this value.
In this article
What is virtual memory?
Virtual memory is a clever resource-management technique used by computers. It compensates for the limitations of RAM (random access memory) by using part of the hard drive or SSD as a temporary extension. In practice, the computer creates a simulated memory space where it can move and temporarily store data, freeing RAM for other tasks. This makes it possible to run demanding programs or switch between several applications at once, even when there is not enough RAM.
If you use a conventional hard disk drive (HDD), the exchange between RAM and storage is very slow and causes noticeable slowdowns. With an SSD, the speed improves considerably, but remains far below that of RAM. Ultra-fast NVMe drives offer the best performance for virtual memory, but even the latest M.2 PCIe 5.0 NVMe SSD cannot match the blazing speed of RAM.
Why is virtual memory still useful?
Despite its limitations in terms of speed, virtual memory remains a valuable ally. It keeps your computer running without crashing, even when it runs out of RAM. By optimizing its use and investing in a high-performance SATA SSD, you can considerably reduce the performance impact while taking advantage of this feature to boost your PC.

 assistouest.fr
Increase the amount of virtual memory in Windows 11
Virtual memory is an essential feature of Windows 11. It takes over when RAM is full, using part of the hard drive or SSD to temporarily store data. Although it is slower than physical RAM, it prevents crashes and keeps the system running smoothly.
If you regularly notice slowdowns or Windows displays error messages indicating a lack of memory, increasing virtual memory can improve your PC’s stability. Here is how to do it step by step.
- Open Windows 11 Settings.
- Under System, click System information.
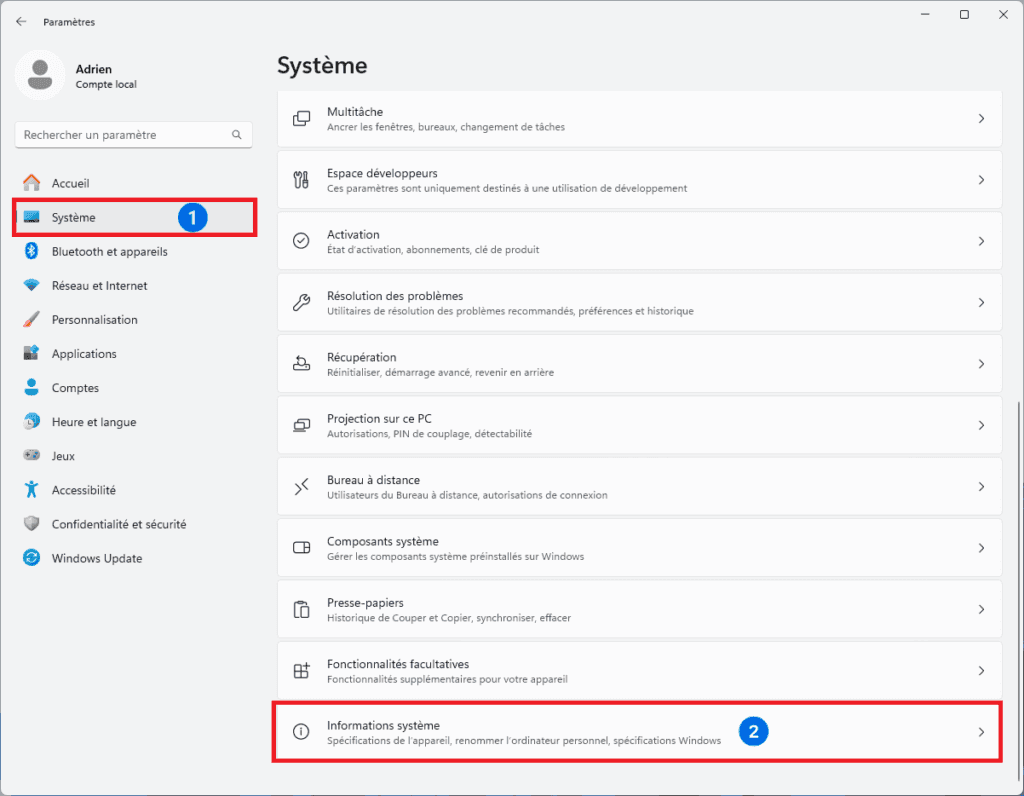
- In System information, click Advanced system settings.
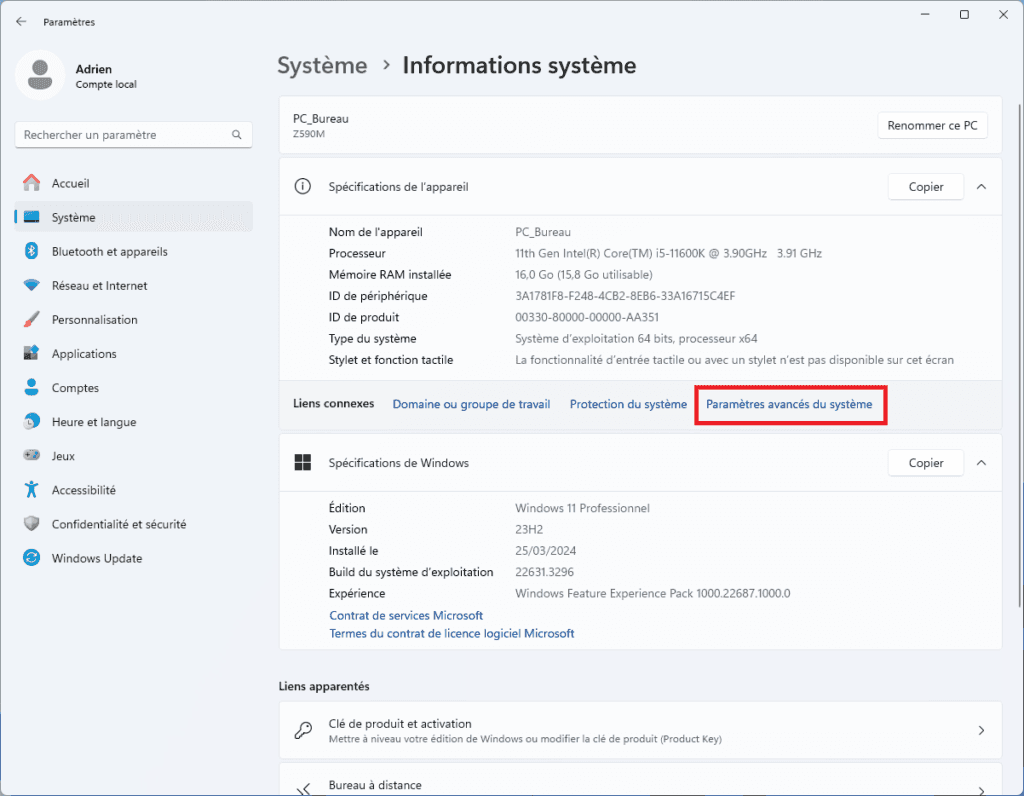
- In the Performance section, click Settings.
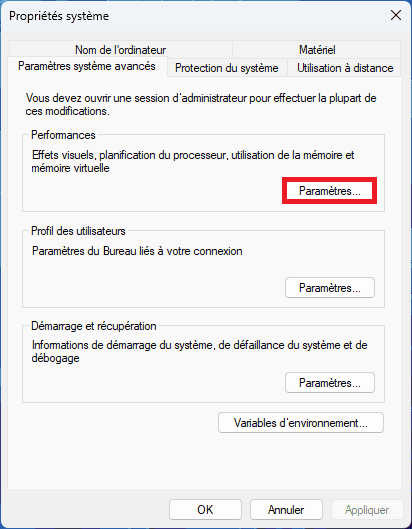
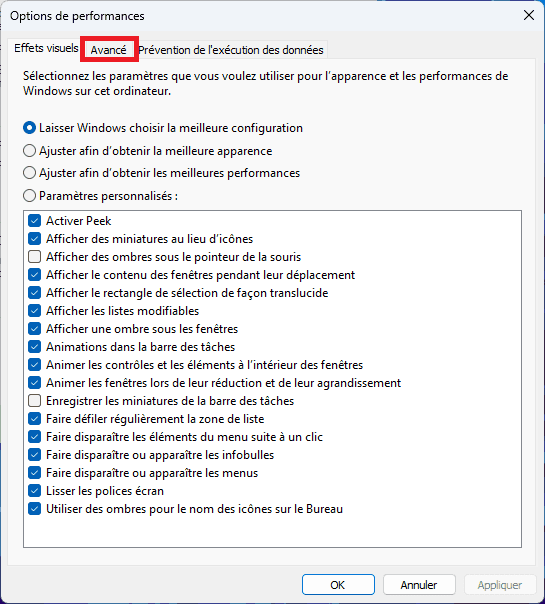
- Open the Advanced tab.
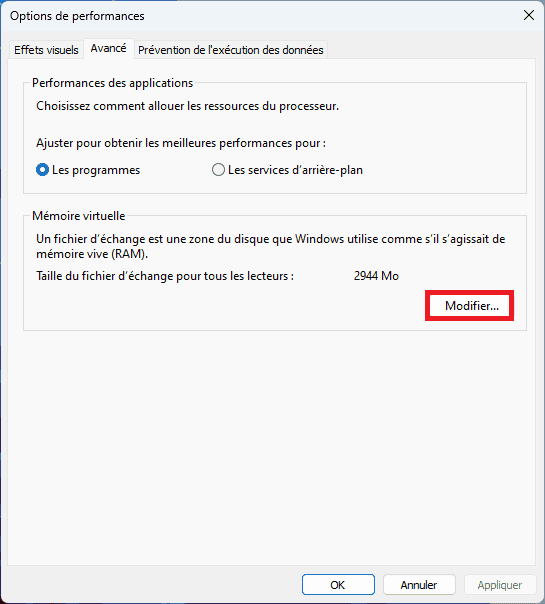
- Finally, in the Virtual memory section, click Change.
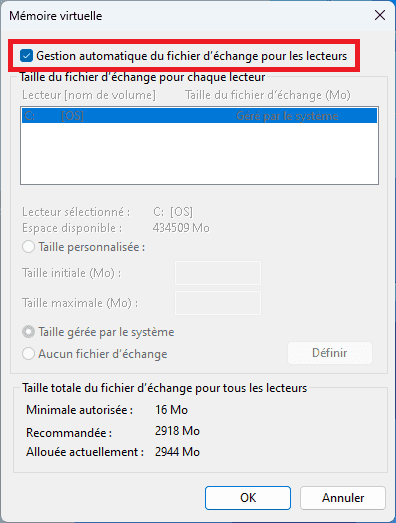
You will then reach the menu where you can manually set the size of the paging file.
Disable automatic Windows management
By default, Windows automatically manages the size of the paging file. This is convenient, but not always optimal: the system may assign a size that is too small or too large, which can cause slowdowns or excessive disk-space consumption.
- To take back control, start by clearing the Automatically manage paging file size for all drives option. You can then define a custom size better suited to your PC’s configuration.
- Then select Custom size and enter the following values according to your configuration.
Choose a size suited to your configuration
The amount of virtual memory to allocate depends directly on the RAM installed in your machine. Here are some recommendations:
- With 4 GB of RAM: set an initial size of 6144 MB and a maximum size of 12288 MB.
- With 8 GB of RAM: choose an initial size of 12288 MB and a maximum size of 24576 MB.
- With 16 GB or more: an initial size of 1024 MB and a maximum size of 8192 MB are sufficient in most cases.
The goal is to keep enough reserve capacity for demanding applications without wasting too much disk space.
Want to go even further?
To optimize your PC’s virtual memory and avoid errors caused by an inaccessible paging file, here are our recommendations:
- Less than 16 GB of RAM: set a minimum size equivalent to 1.5 times the amount of RAM and a maximum size of up to 3 times the amount of RAM for stable performance.
- 16 GB or more: a minimum size of 1024 MB is sufficient in most cases. If some software relies heavily on the paging file, you can increase the maximum size up to 8192 MB.
Although 16 GB or even 32 GB of RAM is enough in most cases, some Windows applications and services require a paging file.
These settings can boost your PC while limiting unnecessary use of disk space.
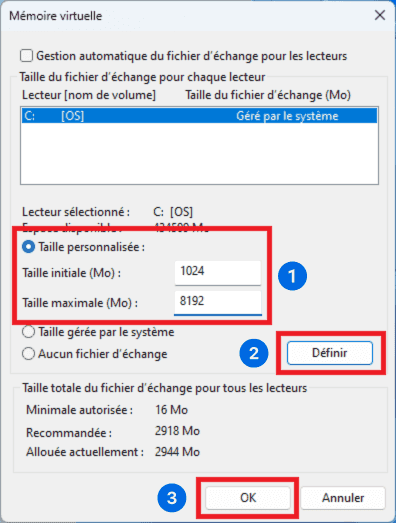
- Click Set, then OK. A warning window will inform you that the changes require a restart to take effect.
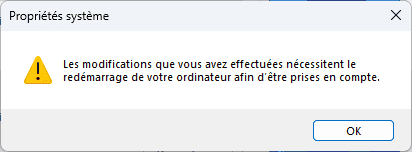
- Close all the windows by clicking OK. The system will then ask you to restart.
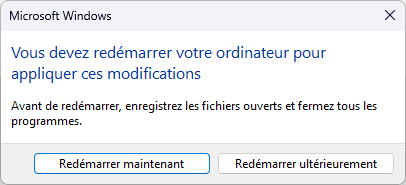
Your virtual memory is now optimized. You should see fewer memory-related error messages and better overall stability when running demanding software or intensive multitasking.
Enable automatic virtual memory clearing
Virtual memory is a useful complement to RAM, but it also has a major drawback: if it is constantly saturated, it can slow down the system and, in some cases, create a security risk. The paging file can contain fragments of sensitive data, such as passwords, files in use and system information.
To limit these risks, Windows can automatically clear the paging file (pagefile.sys) every time the computer shuts down. The operation makes shutdown take a little longer, but it leaves the system cleaner and safer. Depending on the configuration, such as 32 GB on an HDD, deleting this file at shutdown can take a very long time. The benefit is mainly security-related, and the slowdown depends heavily on the type of drive.
- Press Windows + R to open the Run window.
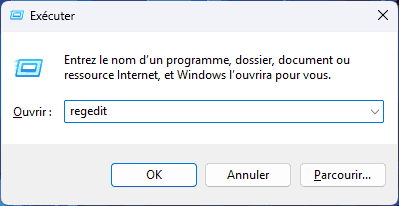
- Type regedit and press Enter. A confirmation window will open; click Yes.
- Then enter the following key in the address bar.
Computer\HKEY_LOCAL_MACHINE\SYSTEM\CurrentControlSet\Control\Session Manager\Memory Management
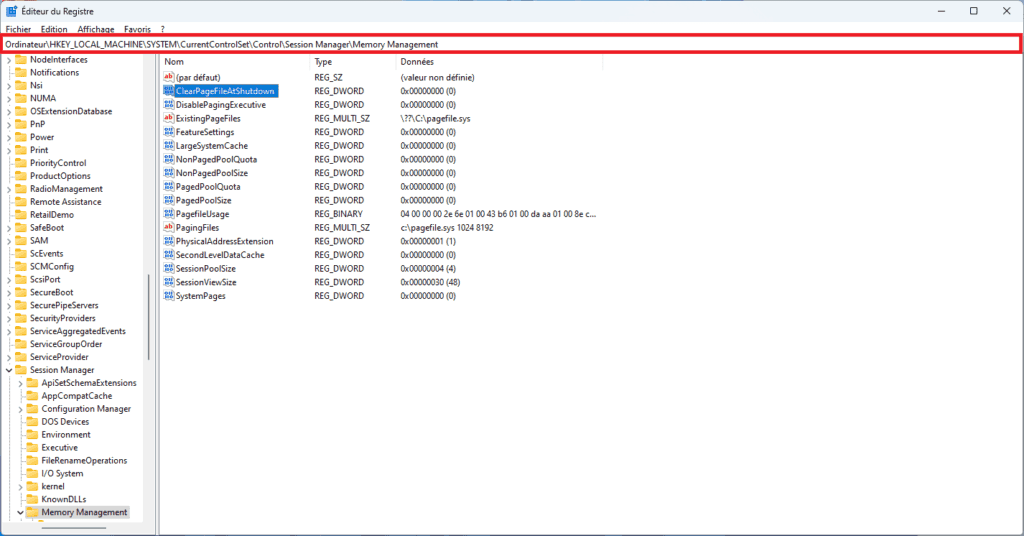
- Double-click the ClearPageFileAtShutdown value and enter 1 in Value data, then confirm. ⚠️
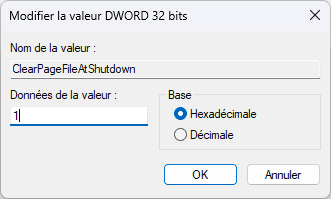
Your paging file will now be cleared every time you shut down, improving security and limiting the problems associated with virtual memory becoming saturated too often.
⚠️ Please note: this operation may slightly increase the PC’s shutdown time, especially if you have a very large paging file or an HDD.
Don’t let the algorithm decide for you
Add Assistouest to your preferred sources on Google so you can find our guides faster when you search for an IT solution.
When is increasing virtual memory no longer enough?
Increasing virtual memory in Windows 11 can help improve system stability and avoid some slowdowns on computers with limited RAM. However, keep in mind that this solution cannot replace a genuine hardware upgrade. Adding RAM (or elsewhere) remains the most effective and sustainable option for improving smoothness and everyday comfort.
In the meantime, adjusting the paging file size can optimize performance and adapt Windows to your needs. Try different settings to find the right balance between responsiveness and disk-space consumption.
Beyond RAM, our slow PC optimization service works on the entire system, with remote computer assistance also available.
The content will unlock automatically after verification.