

Windows 10 will reach end of support in October 2025, leaving many users with a dilemma: upgrade to Windows 11 on an unsupported PC or find one of the Linux distributions that can replace Windows. Ubuntu is a free and easy-to-use Linux distribution that can extend the life of a PC while providing a modern and secure environment. In this guide, we will go through the steps for installing Ubuntu instead of Windows 10.
Do you not want to format the computer on your own? Our workshop provides Linux installation for old PCs, including data backup.
In this article
Why replace Windows 10 with Ubuntu?
Windows 10 is reaching the end of its life and will soon stop receiving security updates. Continuing to use it therefore exposes users to growing vulnerabilities and risks. Ubuntu, by contrast, is a modern and free alternative supported by an active community and regular updates, with long-term support (LTS) lasting up to five years.
In addition to being stable, Ubuntu is lighter than Windows, making it an excellent choice for giving older or modest computers a second life. Its large catalogue of free software, including web browsers, office suites, multimedia tools and even games, covers most everyday needs at no extra cost.
Prepare your PC before installing Ubuntu LTS
Before replacing Windows 10 with Ubuntu, a few preparation steps are essential to avoid unpleasant surprises.
First, check that your computer meets the minimum requirements. Ubuntu is relatively lightweight and can run on most machines, but performance depends partly on the amount of RAM and the processor.
Ubuntu system requirements
| Requirement | Minimum | Recommended |
|---|---|---|
| Processor | 2 cores at 2 GHz | 4 cores or more |
| RAM | 4 GB | 8 GB or more |
| Storage | 25 GB of free space | 50 GB or more (SSD recommended) |
| Graphics card | Compatible with 1024×768 display | Supported 3D acceleration |
| Internet connection | Recommended | Recommended |
Remember to back up all your important data to a USB drive, an external drive or a cloud service, because installing Ubuntu will completely erase Windows 10 and your files.
Then download the latest LTS version (Long Term Support) of Ubuntu from the official website. LTS versions are preferable because they are maintained for five years and offer better stability than interim releases.
Prepare the USB drive to boot the installer
Once the Ubuntu ISO image has been downloaded, you need to transfer it to a USB drive and make the drive bootable. This step is essential for launching the installer when the PC starts.
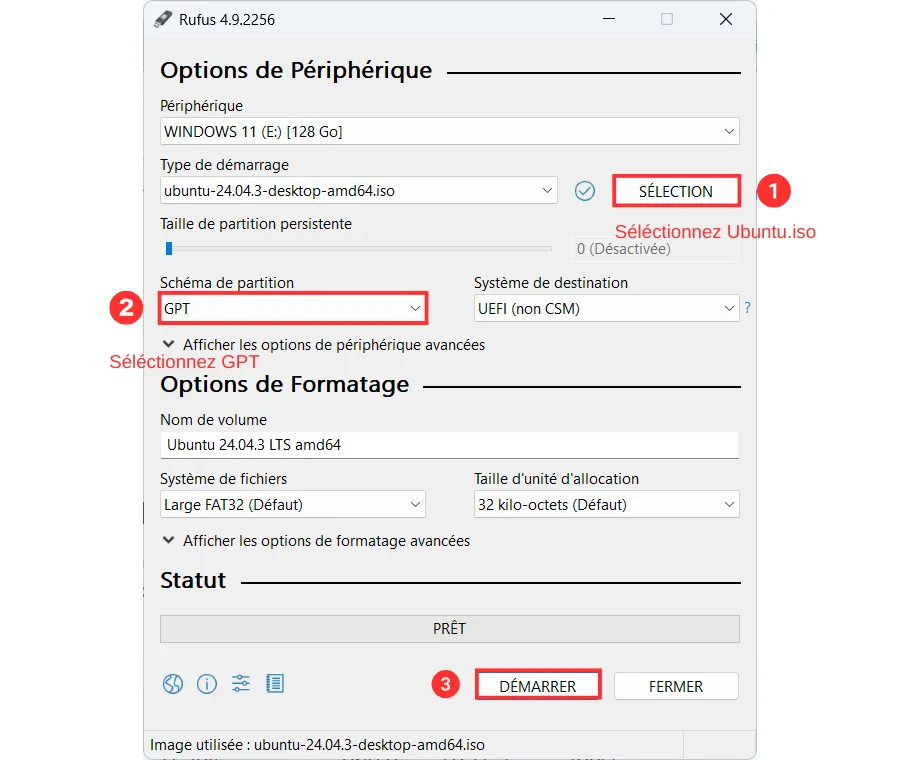
We will use Rufus, a free and lightweight Windows application. Plug in a USB drive of at least 8 GB, open Rufus and follow these steps:
- Select the Ubuntu ISO: click the Select button and choose the ubuntu-XX.XX-desktop-amd64.iso file you downloaded earlier.
- Choose the partition scheme: select GPT and check that the target system is set to UEFI (non CSM), which is compatible with most recent computers.
- Start the creation process: click Start to copy the ISO to the USB drive. All data on the drive will be erased.
Once the operation is complete, your USB drive is ready. You can move on to the next step and start installing Ubuntu.
Boot from the installation USB drive
Once the USB drive has been prepared with Rufus, restart the computer and open the Boot Menu. The key to press varies by PC brand (F2, F12, Escape and so on). You can consult the BIOS/UEFI access keys for your PC brand.
Depending on your current PC configuration, you may also need to disable Secure Boot before starting Ubuntu. These steps are not always required; it depends on your BIOS default settings.
Once you are in the boot menu, select your USB drive as the boot device.
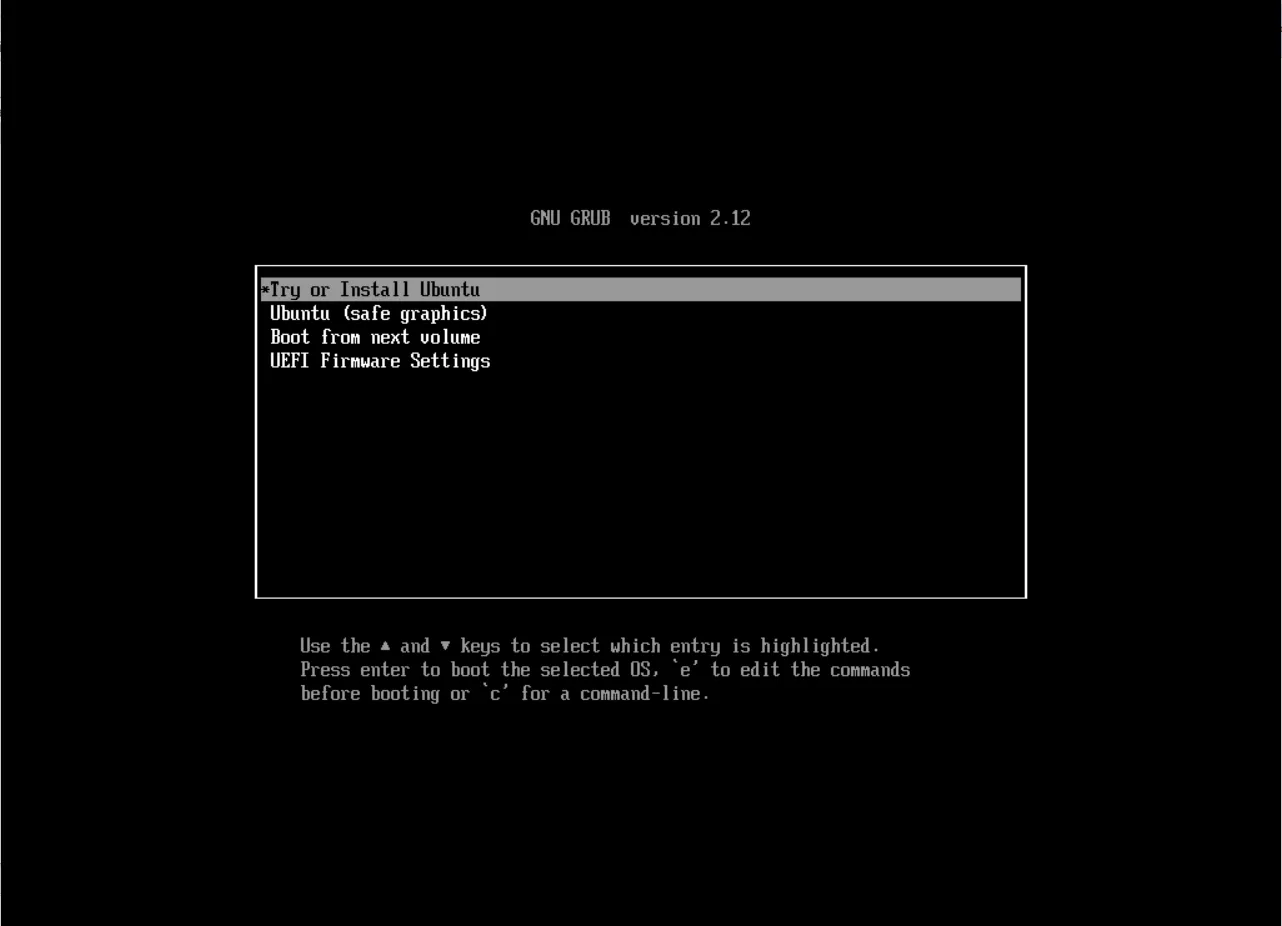
The Ubuntu welcome screen (GRUB) will then appear. Choose Try or Install Ubuntu to start the installer and begin the installation process.
Install Ubuntu LTS on your PC
The Ubuntu installer is designed to be simple, intuitive and accessible to everyone, including people who have never installed an operating system before. Each step is clearly explained, so you can get started confidently. Let us look at how to proceed.
1. Choose the installation language
When the installer starts, the first step is to select a language. This option determines not only the language of the installation menus, but also the interface, default applications and system messages.
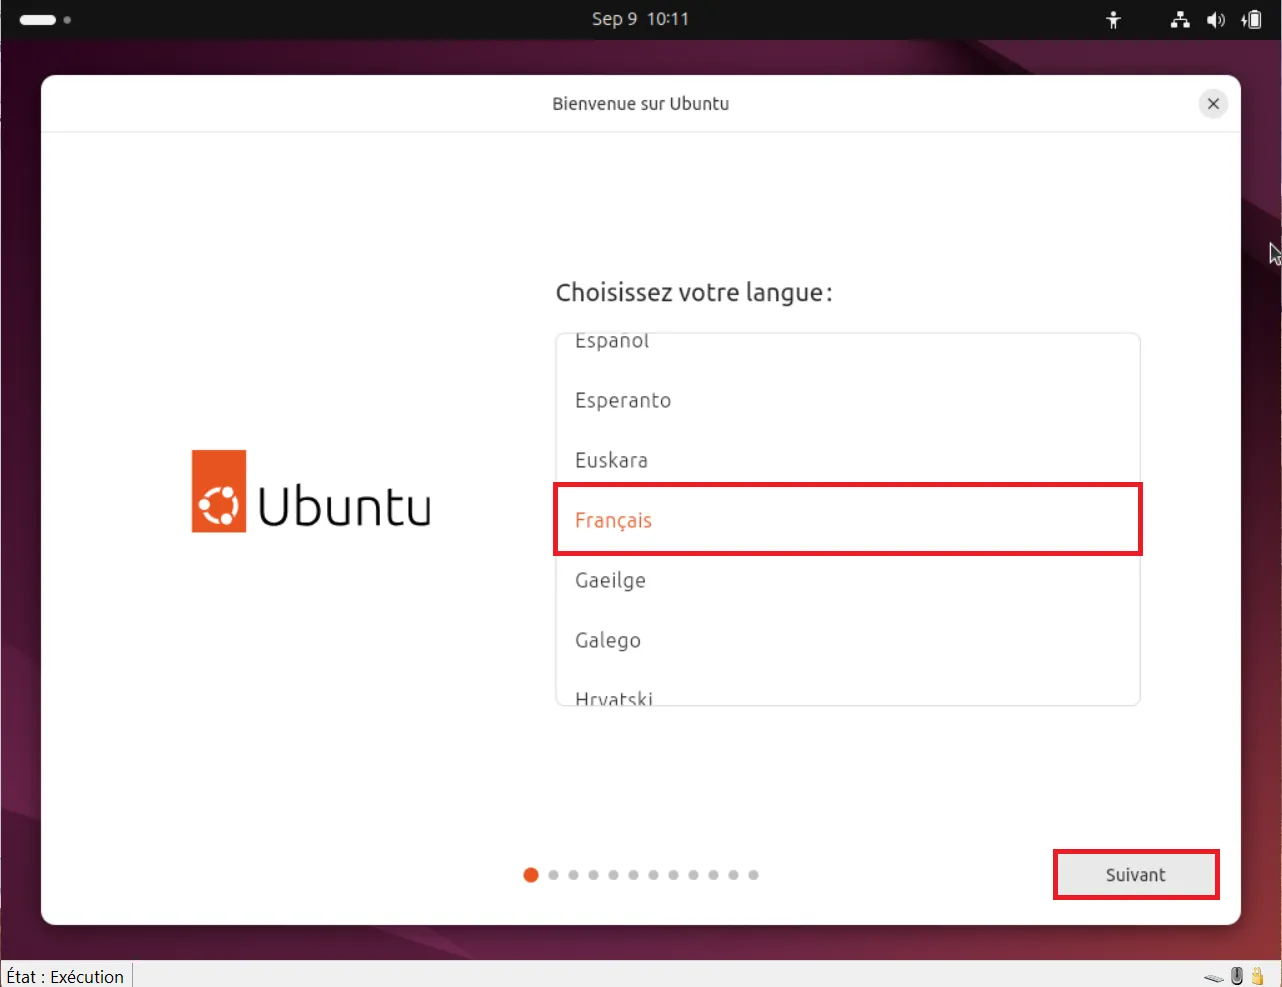
For everyday use in English, choose English and click Next. The system will then be fully translated and ready to use when the installation is complete.
If you plan to use Ubuntu in a multilingual environment, it is always possible to add other languages after installation through the system settings.
2. Configure accessibility
The second installer step concerns accessibility. Ubuntu displays several options designed to improve the experience of users with specific needs:
- Vision: more readable fonts, high contrast and zoom.
- Hearing: visual feedback for sound notifications.
- Typing: on-screen keyboards and adjustable key repeat.
- Pointing and clicking: options for people who have difficulty using a mouse.
If you do not have specific needs, click Next to continue.
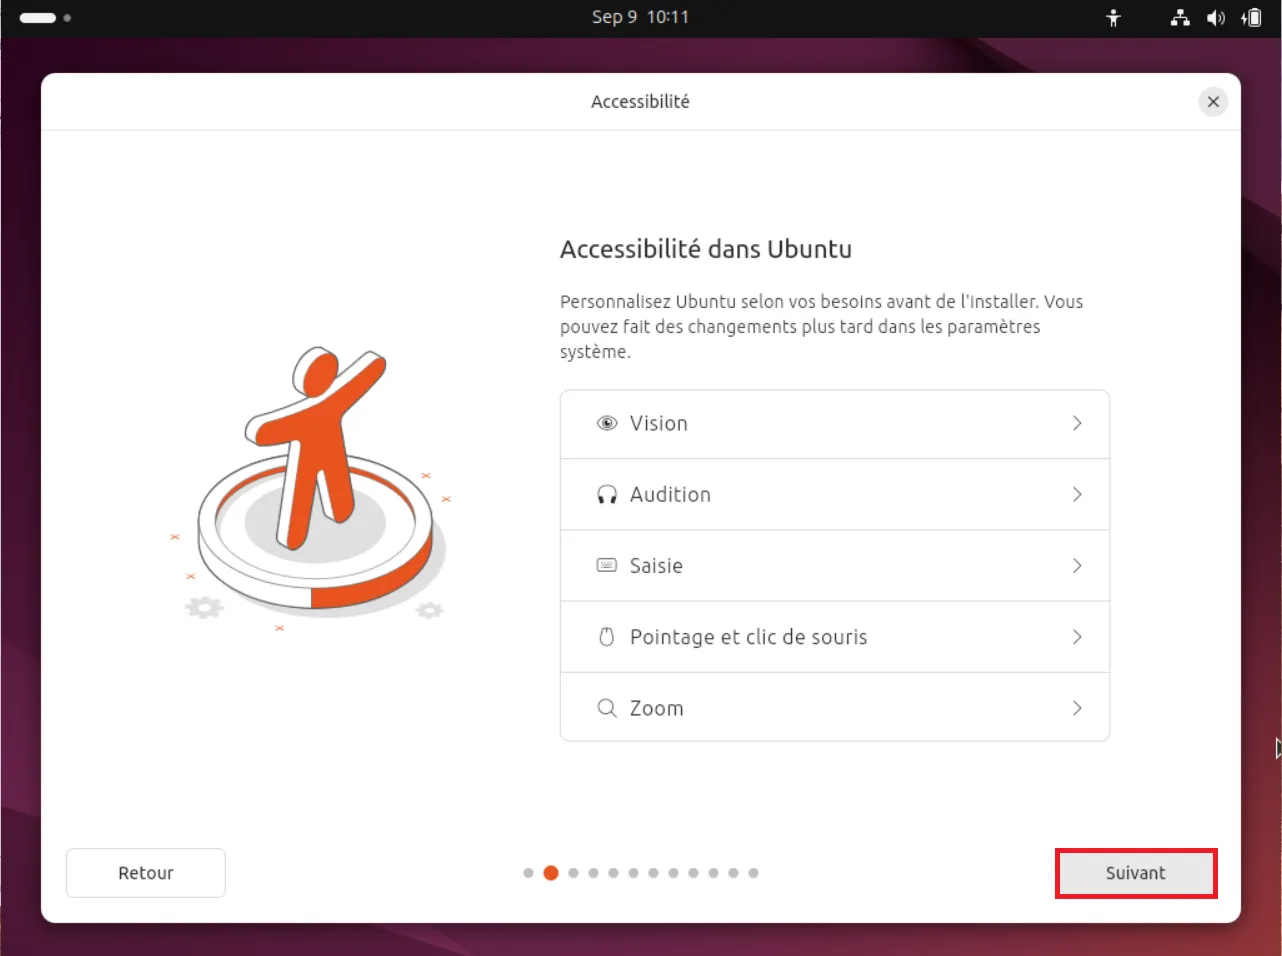
These settings are not permanent. Even if you skip them here, you can enable or change them at any time from Settings > Accessibility once Ubuntu is installed. This lets you adapt the system without reinstalling it.
3. Select the keyboard layout
The next step is to configure the keyboard layout, meaning the relationship between the physical keys and the characters shown on screen.
By default, if you use a standard QWERTY keyboard, select English (US) or the variant that matches your keyboard. This ensures that the keys correspond to your typing habits.
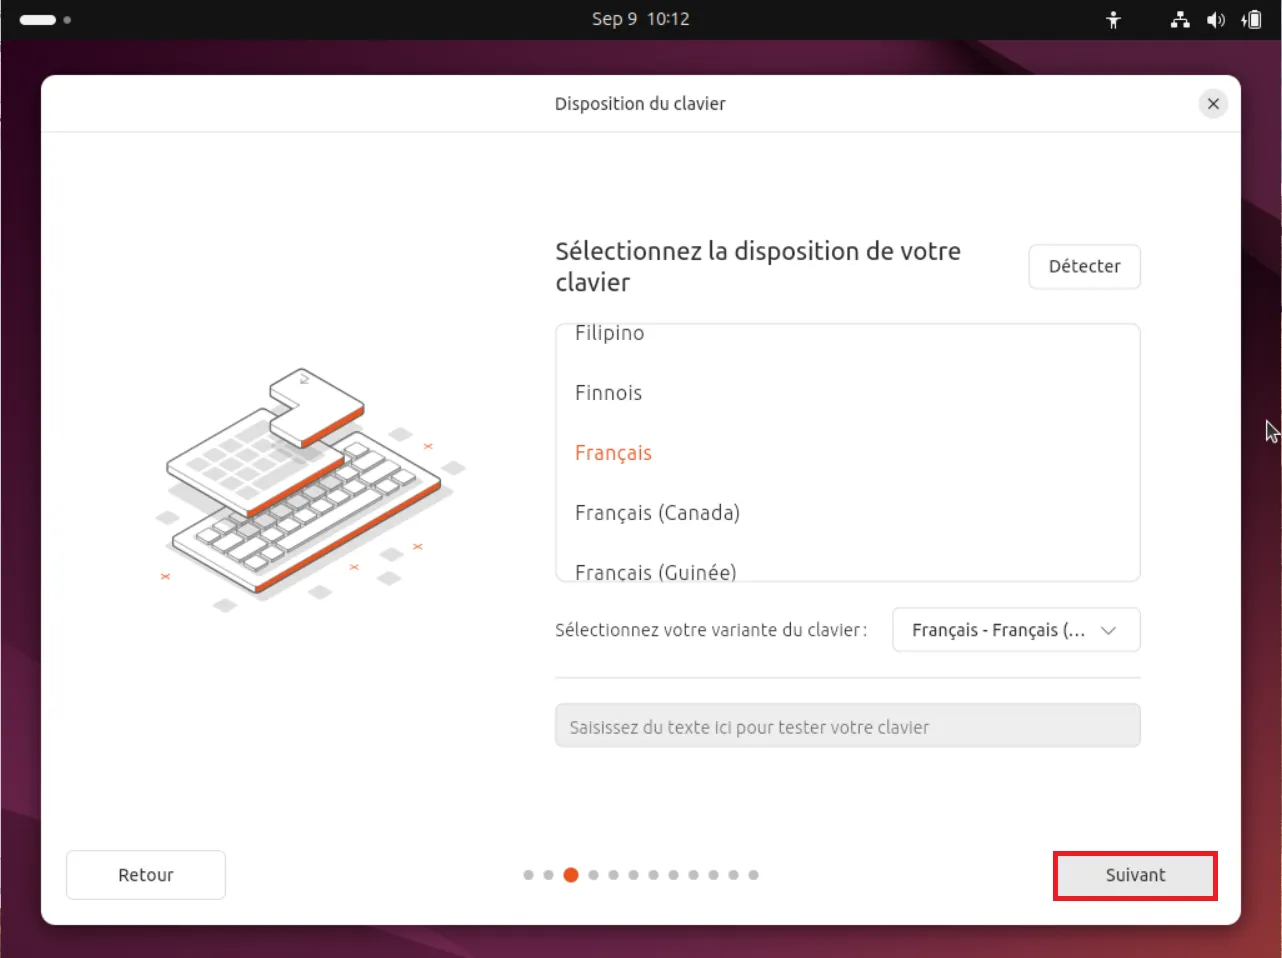
Ubuntu provides a test area so that you can type a few characters and check that everything works as expected.
If you use another keyboard type, such as Canadian or Swiss, this is where you can select the most suitable variant. As with accessibility, this setting can be changed later in the system settings.
4. Connect to the Internet
The installer then offers to connect your computer to the Internet. This step is important because it allows Ubuntu to download the latest updates and some hardware drivers during installation.
- Wired connection (Ethernet): if your PC is connected to the router with a network cable, detection is automatic. You do not need to configure anything.
- Wi-Fi connection: the installer displays available networks. Select yours and enter your Wi-Fi password.
If you prefer to install Ubuntu without the Internet, you can skip this step. Installation will continue, but some components will have to be added manually after restarting.
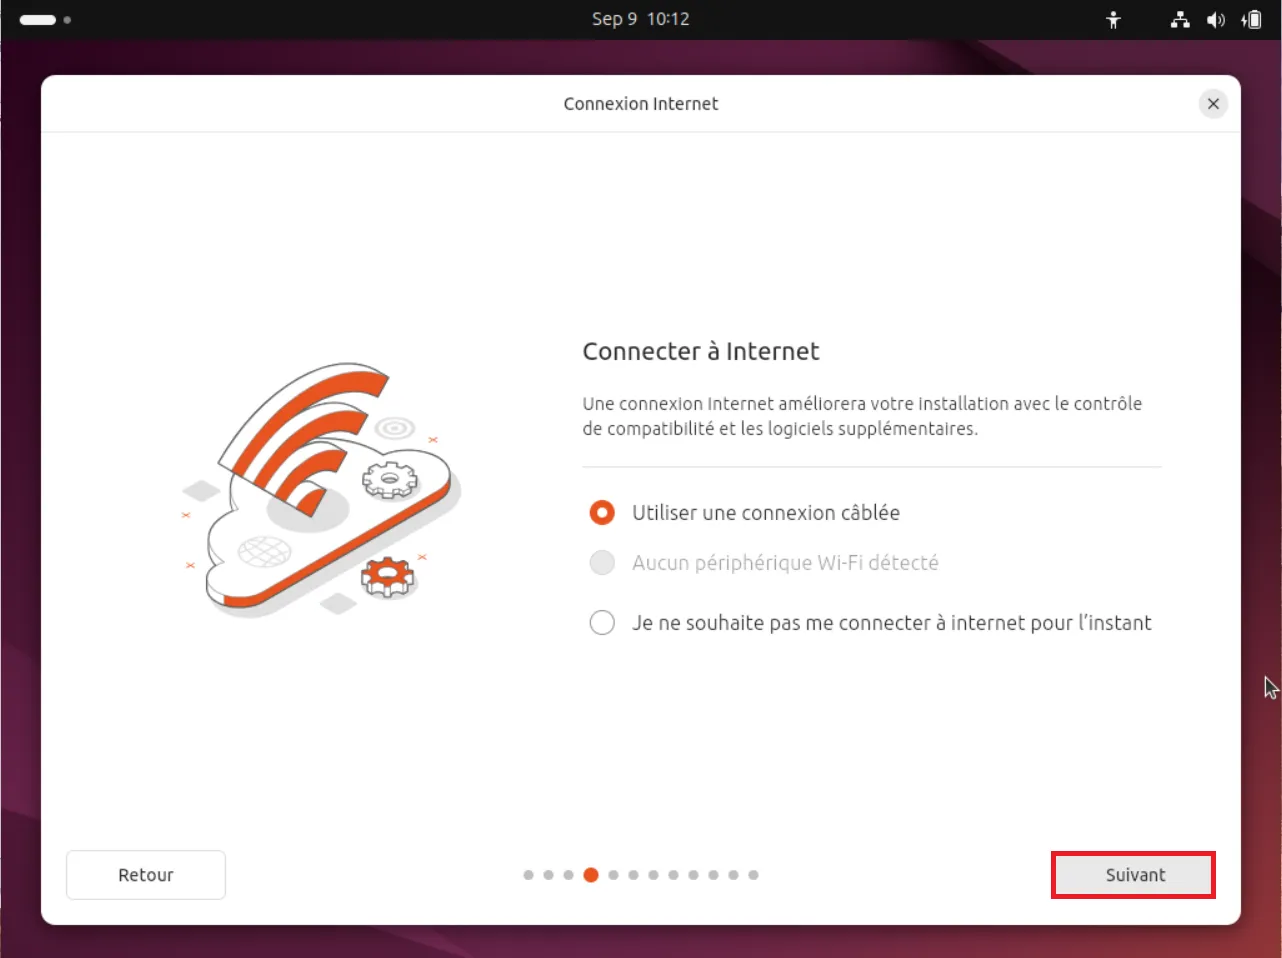
Connecting to the Internet now is strongly recommended. It gives you an up-to-date system that is ready to use after installation, without requiring large updates at the first start.
5. Try or install Ubuntu
At this stage, the installer offers two options:
- Try Ubuntu: starts the system directly from the USB drive without installing anything on the hard drive. It is an excellent way to test the interface, check hardware compatibility (Wi-Fi, sound and graphics) and get familiar with Ubuntu. All changes made in this mode are temporary and disappear after restarting.
- Install Ubuntu: immediately starts the installation process on your computer. Choose this option if you want to replace Windows 10 or install Ubuntu on a new drive.
If your goal is to say goodbye to Windows 10 and switch permanently to Ubuntu, select Install Ubuntu. You will then be guided step by step until the process is complete.
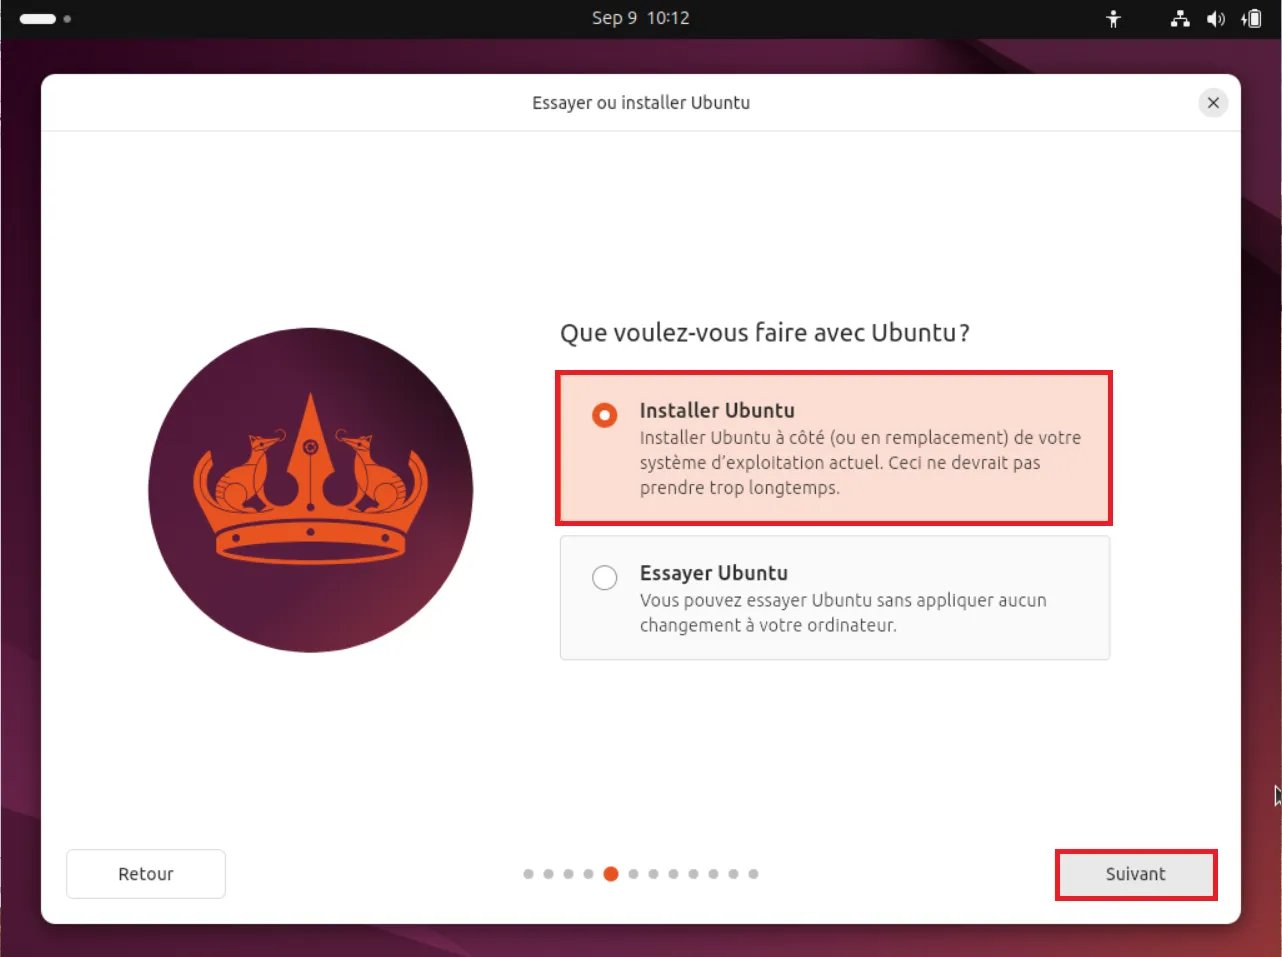
Even if you have made up your mind, it can be useful to spend a few minutes in live mode (Try Ubuntu) to check that your hardware works correctly. This avoids unpleasant surprises after installation.
6. Choose the installation type
Ubuntu then offers two installation methods for different types of users:
- Interactive installation: the guided mode designed for most users. Each step is explained on screen, including software selection, disk configuration and account creation. It is ideal for a first Ubuntu installation.
- Automated installation: intended for advanced users, this mode runs a predefined installation without intervention. It is mainly used in professional environments where Ubuntu is deployed on several machines.
To replace Windows 10 on a personal computer, choose Interactive installation. You will receive step-by-step guidance that limits errors and makes the process much more accessible.
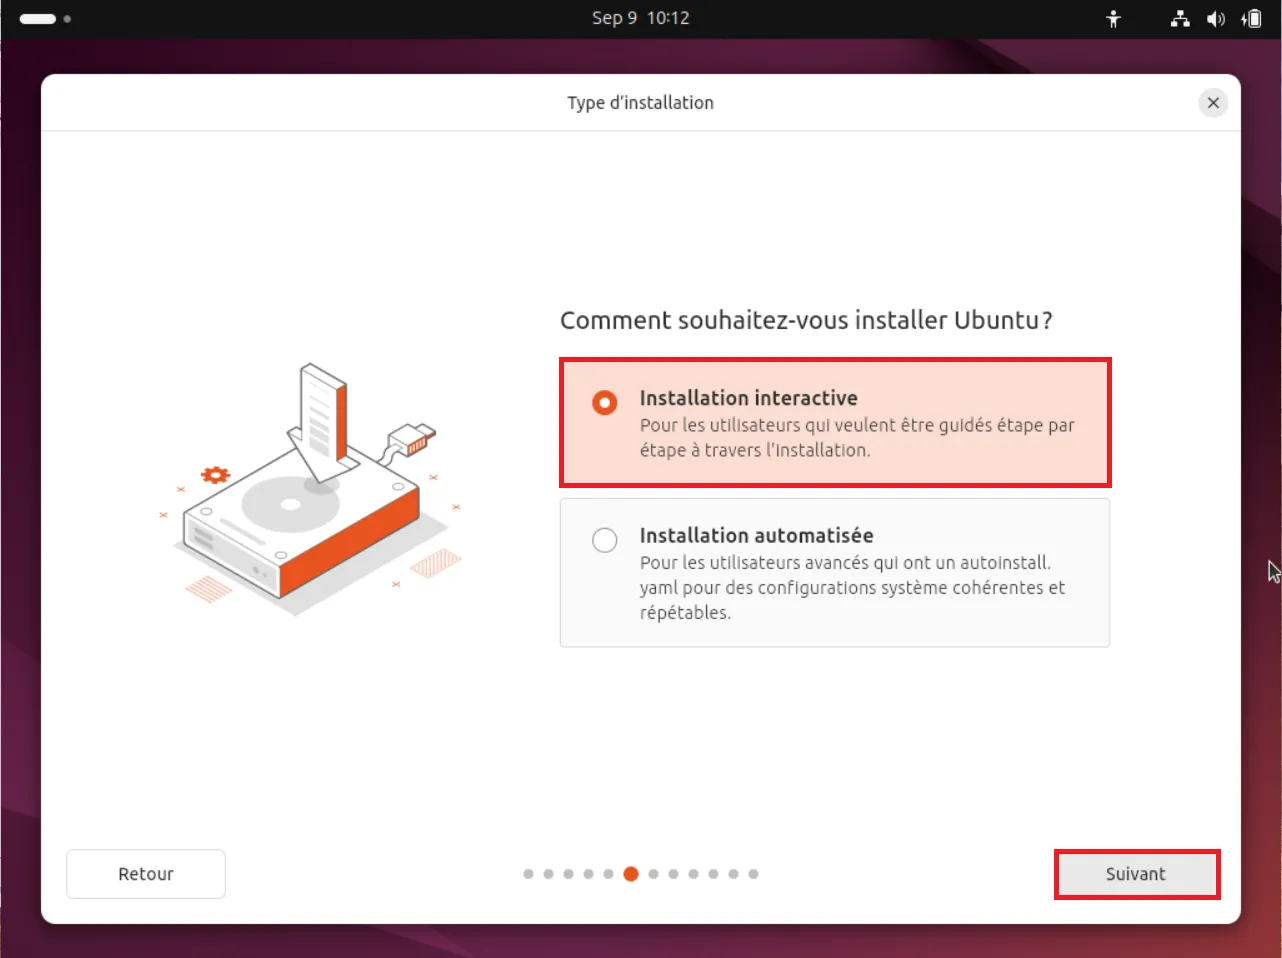
Even in interactive mode, you can customize certain settings, such as software, partitioning and the username. It is a good compromise between simplicity and flexibility.
7. Choose the software to install
Ubuntu then asks you to choose the type of software installation. Two options are available:
- Default installation: installs only the key components, such as the web browser and a few basic utilities. It suits users who want to build their environment themselves.
- Full installation: also installs LibreOffice, multimedia software such as audio and video players, and other everyday tools. The system is immediately ready to replace Windows.
If you are new to Linux or want a ready-to-use experience, Full installation is the best choice. You will have a complete environment from the first start.
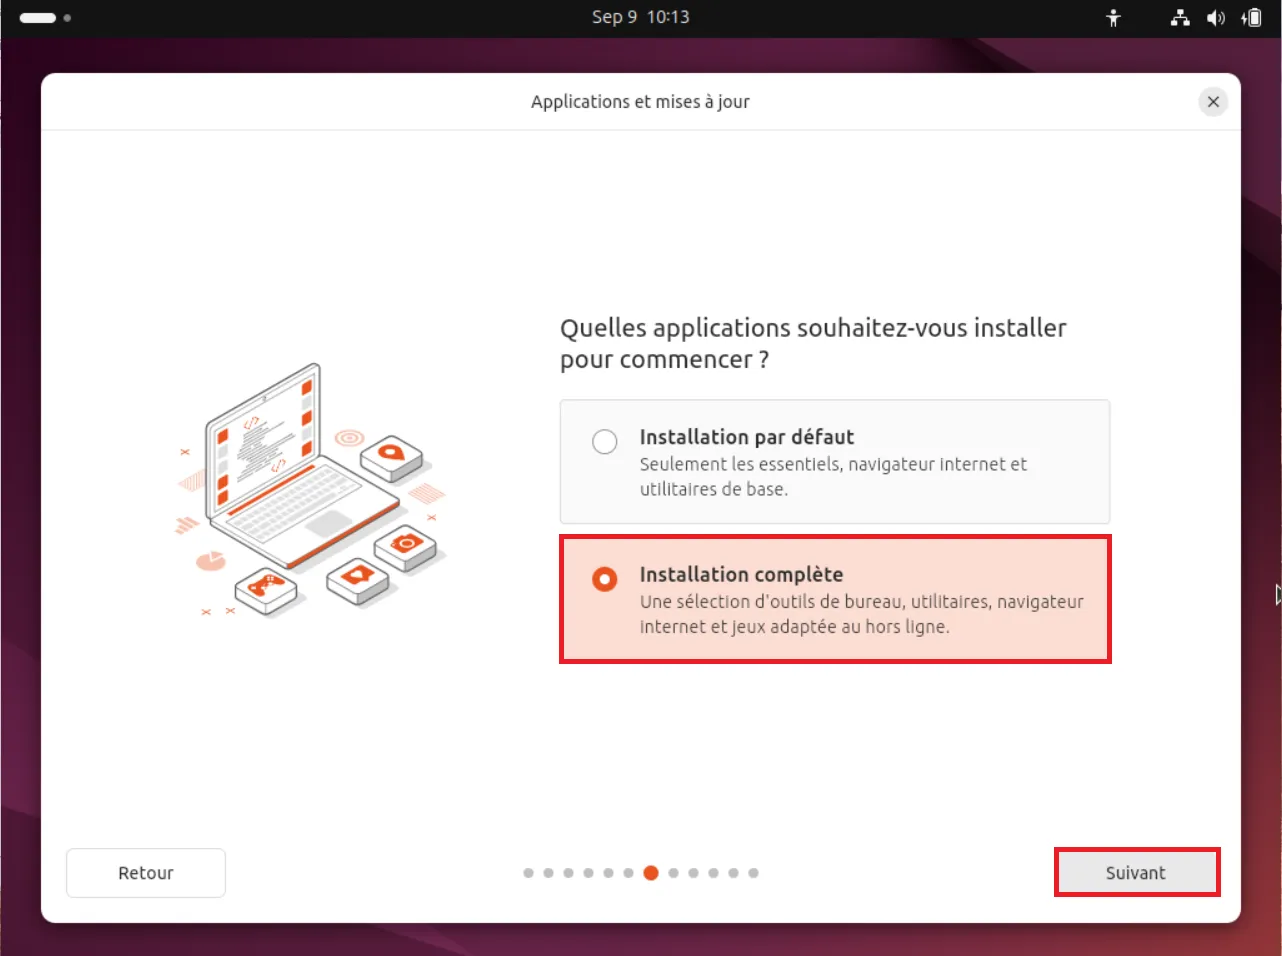
Even if you choose the default installation, you can easily add software later through the Ubuntu Software Center or the command line.
8. Enable additional software
By default, Ubuntu does not include some proprietary components, such as graphics drivers and multimedia codecs, for licensing reasons. Without any action, some audio or video files and certain Wi-Fi or graphics cards may not work correctly after installation.
To avoid this, the installer offers two checkboxes:
- Install third-party software for graphics and Wi-Fi hardware support: adds the proprietary drivers needed for your graphics card (NVIDIA or AMD) and Wi-Fi card to work fully.
- Download and install support for additional media formats: lets you play common audio and video files such as MP3, MP4 and AVI, which are not supported natively for legal reasons.
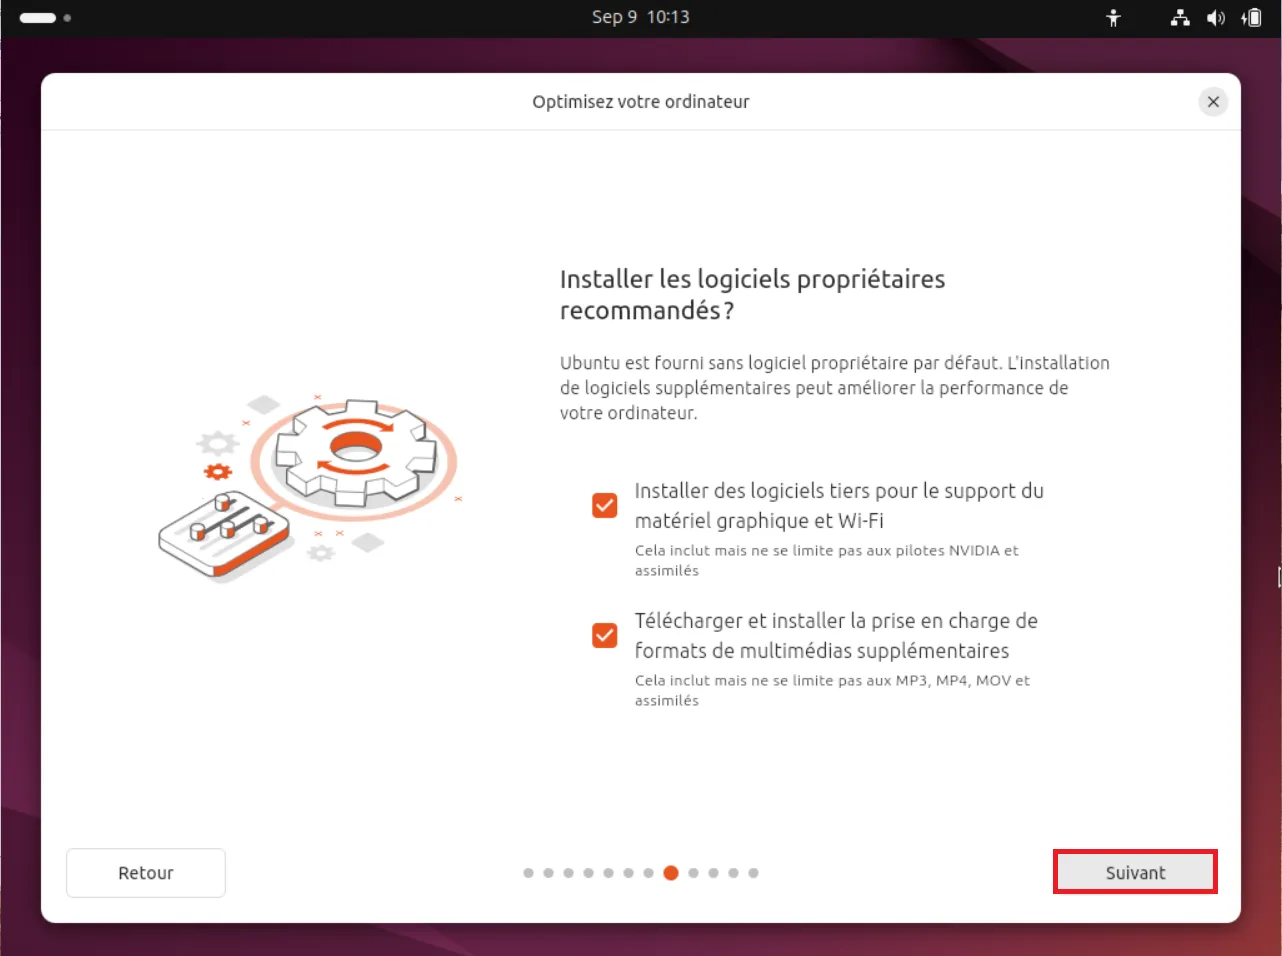
Checking both boxes ensures that your system is compatible with your hardware and can play your media from the first start.
9. Choose the partitioning method
We have reached the most delicate installation step: managing the hard drive. This is where you decide where and how Ubuntu will be installed. Two main options are available:
- Erase disk and install Ubuntu: removes everything from the hard drive (Windows, personal files and software) and installs Ubuntu instead. This is the simplest solution if you want to switch permanently to Linux.
- Manual partitioning: intended for advanced users, this mode lets you create, modify or delete partitions. It is essential if you want to keep Windows and install Ubuntu in dual boot, or create a custom partition layout.
⚠️ Warning: if you choose Erase disk, all data in Windows will be permanently deleted. Before confirming, back up important documents to an external drive, USB drive or cloud storage.
To replace Windows 10 with Ubuntu, the fastest and safest method is Erase disk and install Ubuntu. The installer automatically creates the required partitions and configures the system.
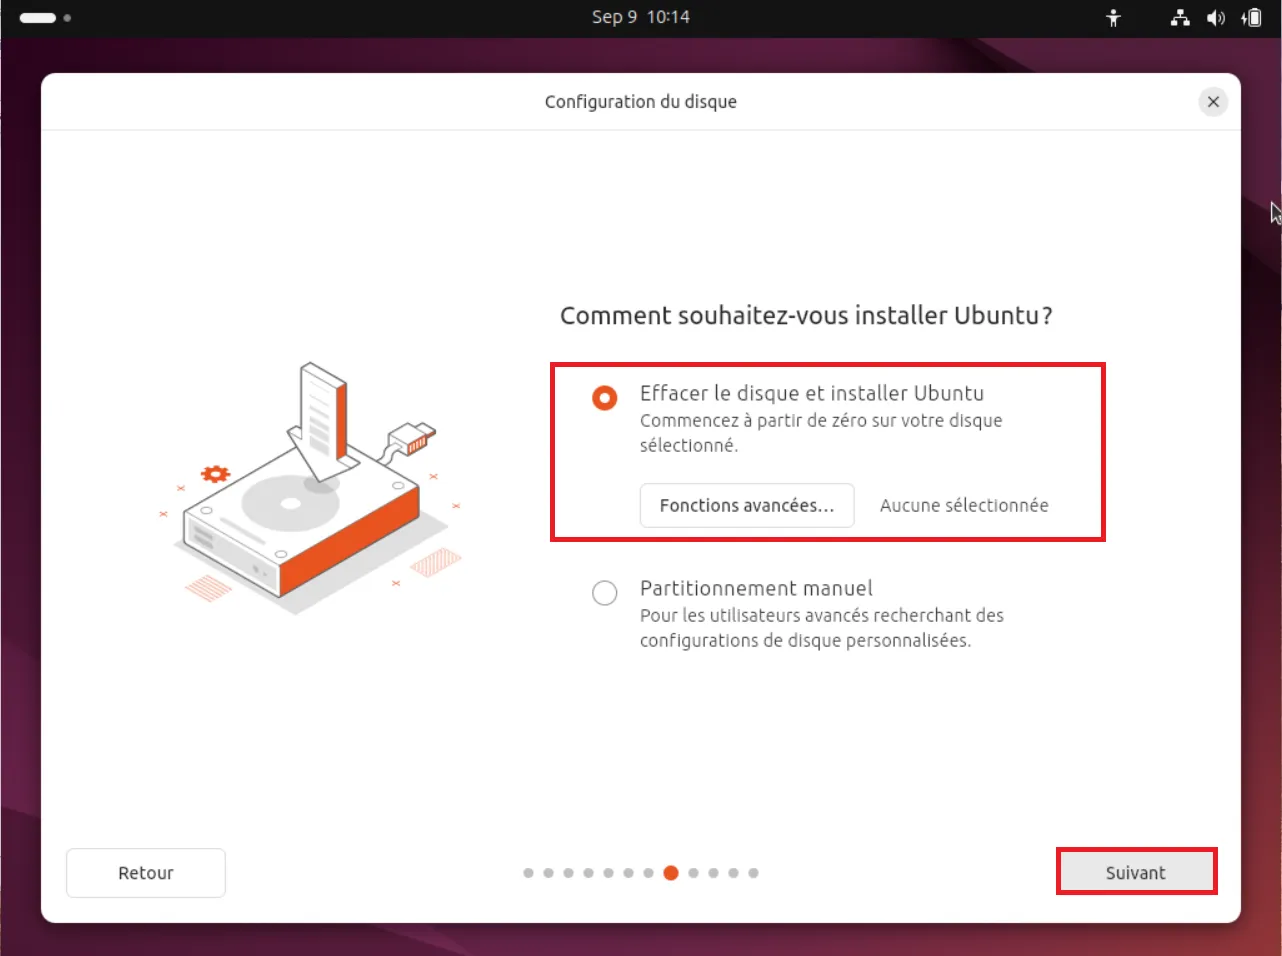
If you are unsure or want to keep Windows alongside Ubuntu, choose Windows and Ubuntu dual boot. You can then choose between Windows and Ubuntu each time the computer starts.
10. Create your user account
The last configuration step is to create your main user account, which you will use to sign in and administer Ubuntu.
You need to provide the following information:
- Full name: used to identify the account in the interface.
- Computer name: useful when connecting your PC to a local network, so the machine can be identified easily.
- Username: the identifier used to sign in. By convention, use lowercase letters without accents.
- Password: choose a strong password of at least 8 characters, mixing letters, numbers and symbols. You will enter it twice for confirmation.
By default, Ubuntu asks for the password every time you sign in. It is strongly recommended to leave this option enabled, especially if other people can access your computer.
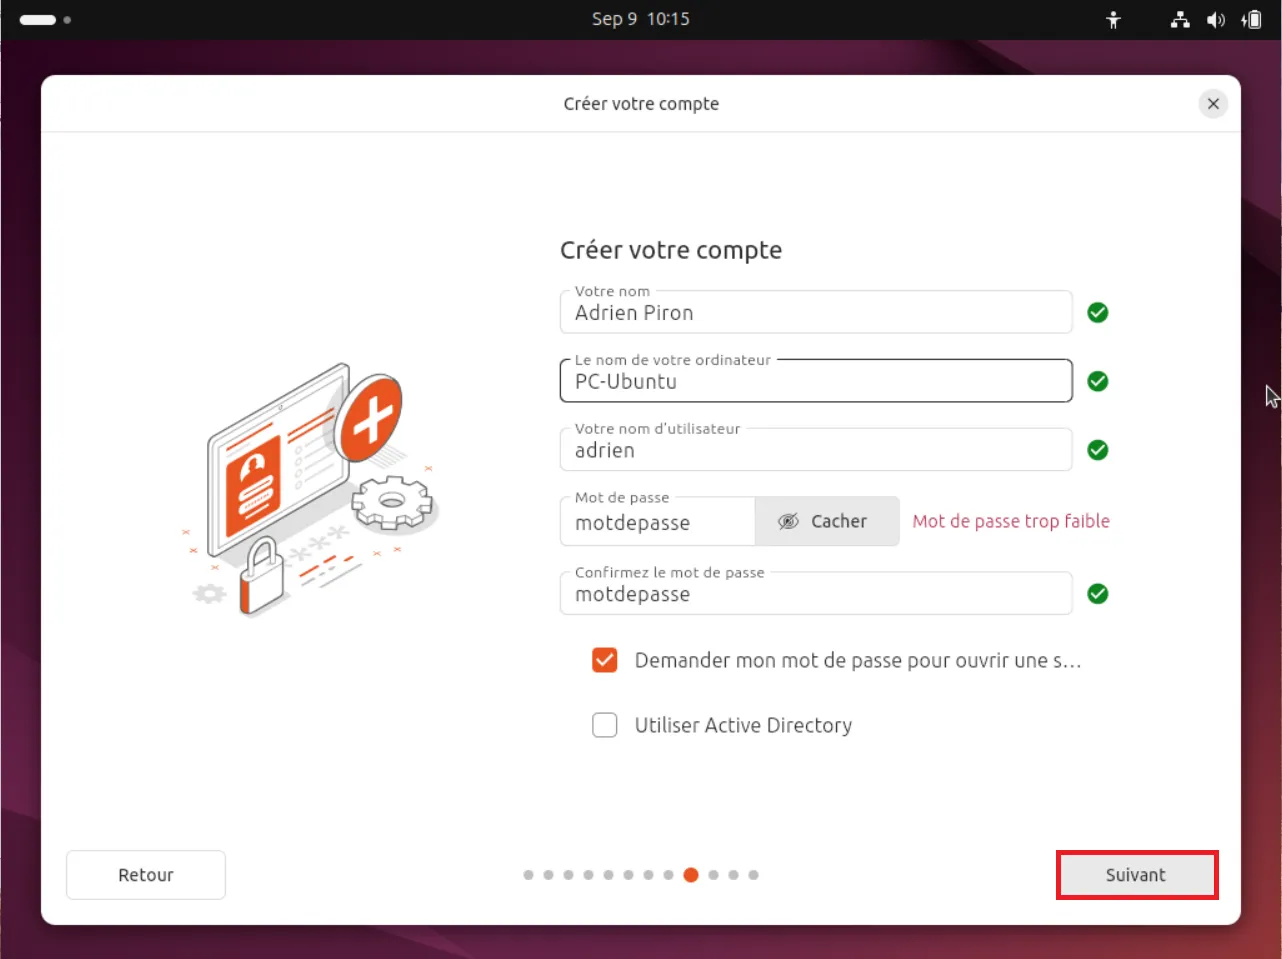
This user account also has administrative rights through the sudo command, allowing you to install or modify software. If you create other accounts later, you can limit their permissions for greater security.
11. Select your time zone
Ubuntu then asks you to set your geographical location. This setting automatically adjusts the date, time and certain formats used by the system, such as currency, number format and calendar.
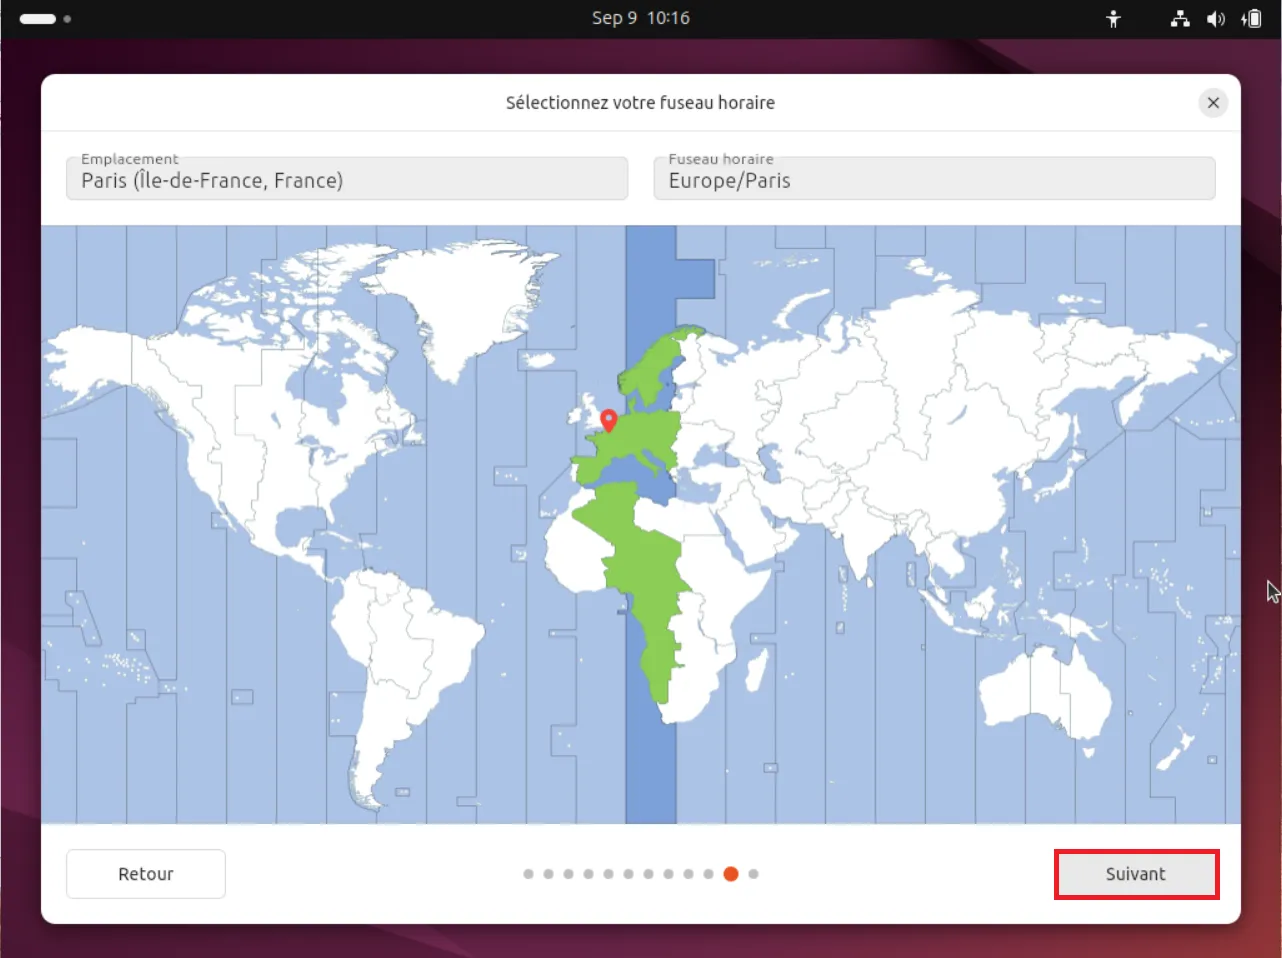
For use in France, select Paris – Europe/Paris. If you live elsewhere, choose the city closest to your time zone. Ubuntu detects your location through the Internet connection, but you can also set it manually on the map.
12. Check the settings before installation
Before starting the installation, Ubuntu displays a summary of your choices. This screen lets you check that everything is configured correctly before changes are applied to the hard drive.
It includes:
- The selected partitioning method, such as Erase disk and install Ubuntu.
- The hard drive selected for installation.
- The chosen software installation type, full or minimal.
- The additional software enabled, including proprietary drivers and media codecs.
Take the time to read every item carefully. If everything matches your expectations, click Install to start.
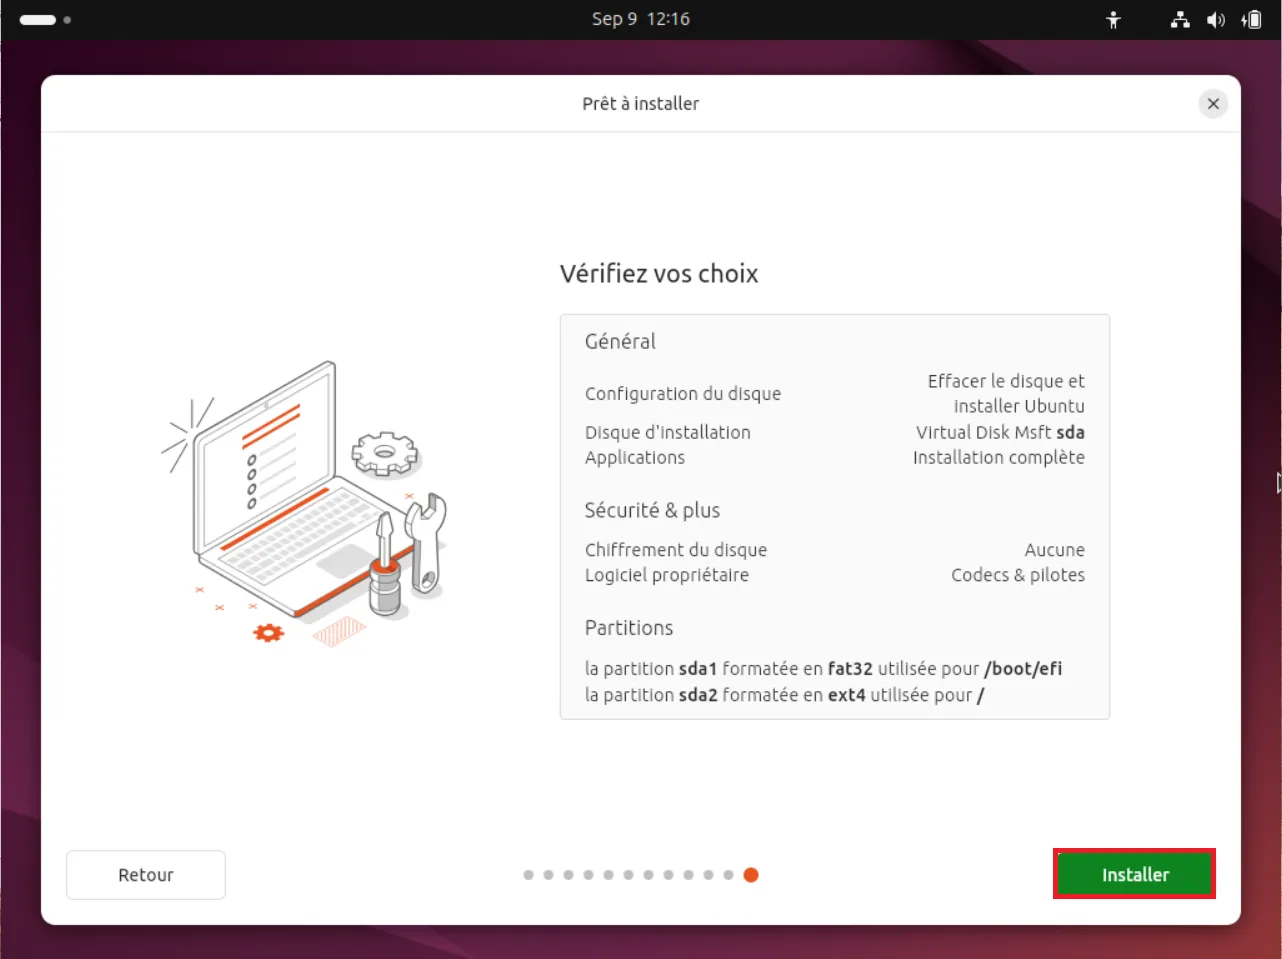
⚠️ From this point on, changes to the hard drive become irreversible. Make sure you have backed up your important files before continuing.
13. Installation progress
The installation can now begin. Ubuntu automatically copies the system files, configures the partitions and installs the software you selected, either the full or minimal version.
This stage takes between 10 and 20 minutes, depending on your computer’s performance and drive speed. During this time, the installer displays screens explaining Ubuntu’s main features, including its modern interface, integrated tools, software management and security.
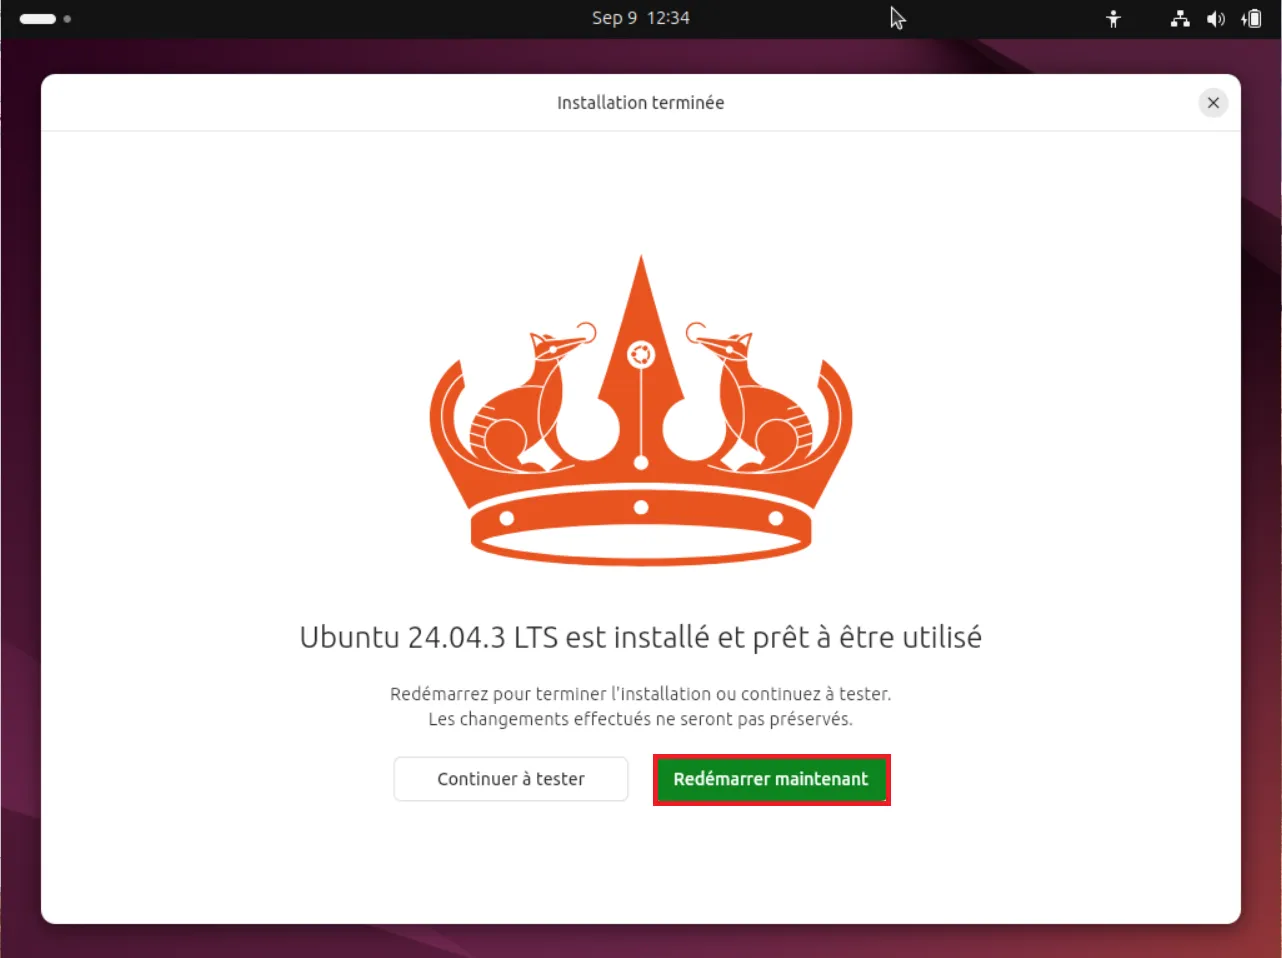
Once installation is complete, a message confirms that Ubuntu is ready to use. Click Restart Now to finish.
⚠️ Before the PC restarts, remember to remove the installation USB drive. If it remains connected, the computer may launch the installer again instead of starting the new system.
Welcome to Ubuntu: first steps after installation
Once Ubuntu is installed and you have signed in, you will discover a simple and uncluttered desktop, along with essential tools that you will soon use.
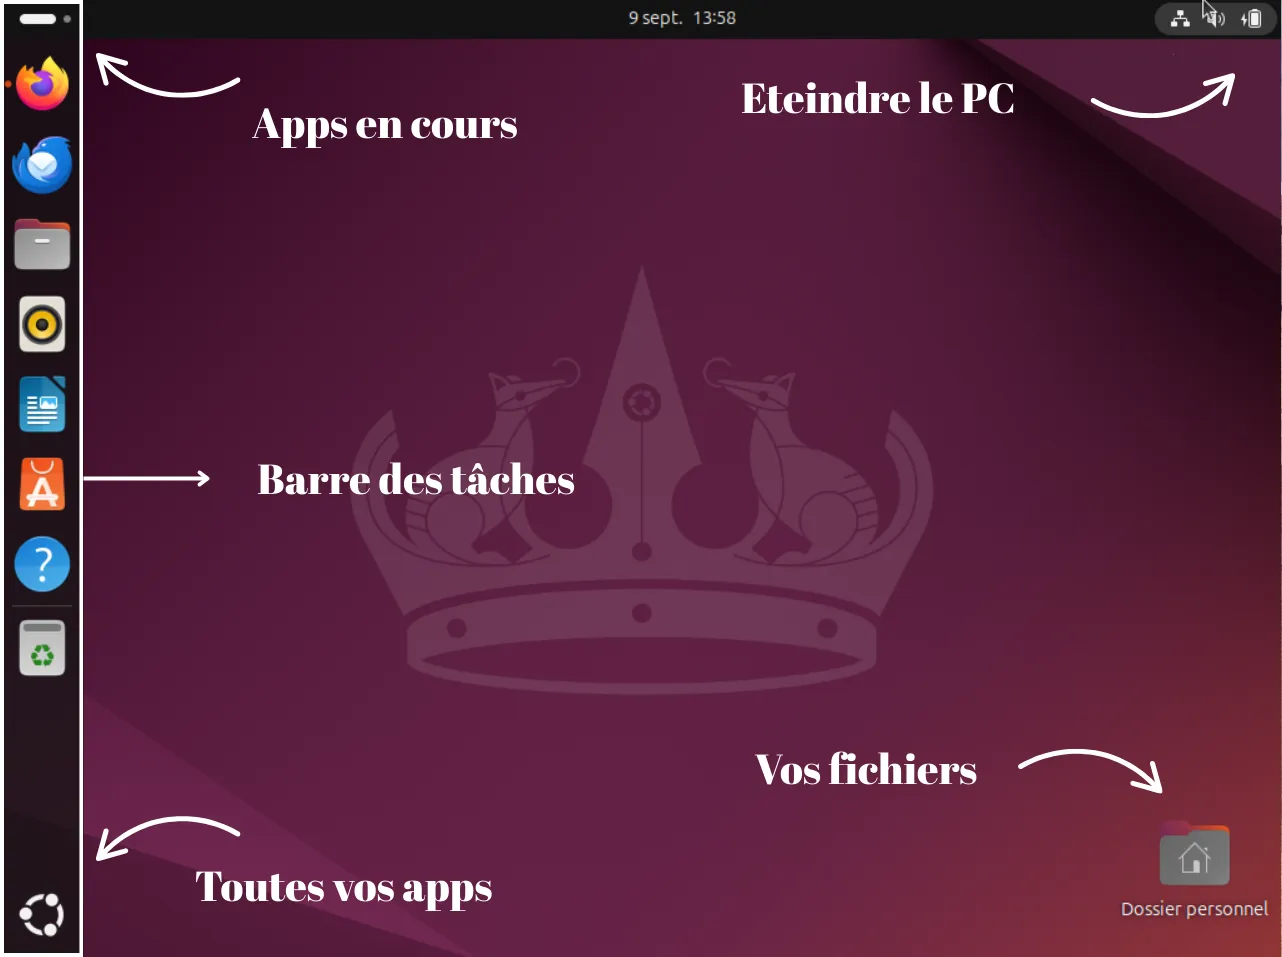
After signing in, you arrive at the Ubuntu desktop, the main workspace where everything begins. Here is a quick overview of the essential elements:
- The taskbar on the left: this is the dock, which displays your favourite and open applications. You can pin your preferred software for quick access.
- Running applications: they appear in the dock with a small indicator. Click one to reopen it or switch to it.
- The “Show Applications” button: at the bottom of the dock, it opens a complete view of installed applications organized by category.
- The Home folder: this is the equivalent of Windows’ This PC. It contains your documents, pictures, videos and other files.
- The system menu in the top right: groups the controls for sound, network, brightness and power. This is also where you can suspend or shut down your PC.
Ubuntu’s interface is designed to be intuitive. If you are coming from Windows, you will quickly find your bearings. You can also customize it with themes, icons and different dock layouts.
2. The App Center
Ubuntu has its own App Center, similar to the Microsoft Store or the App Store. This is where you can easily search for and install new software.
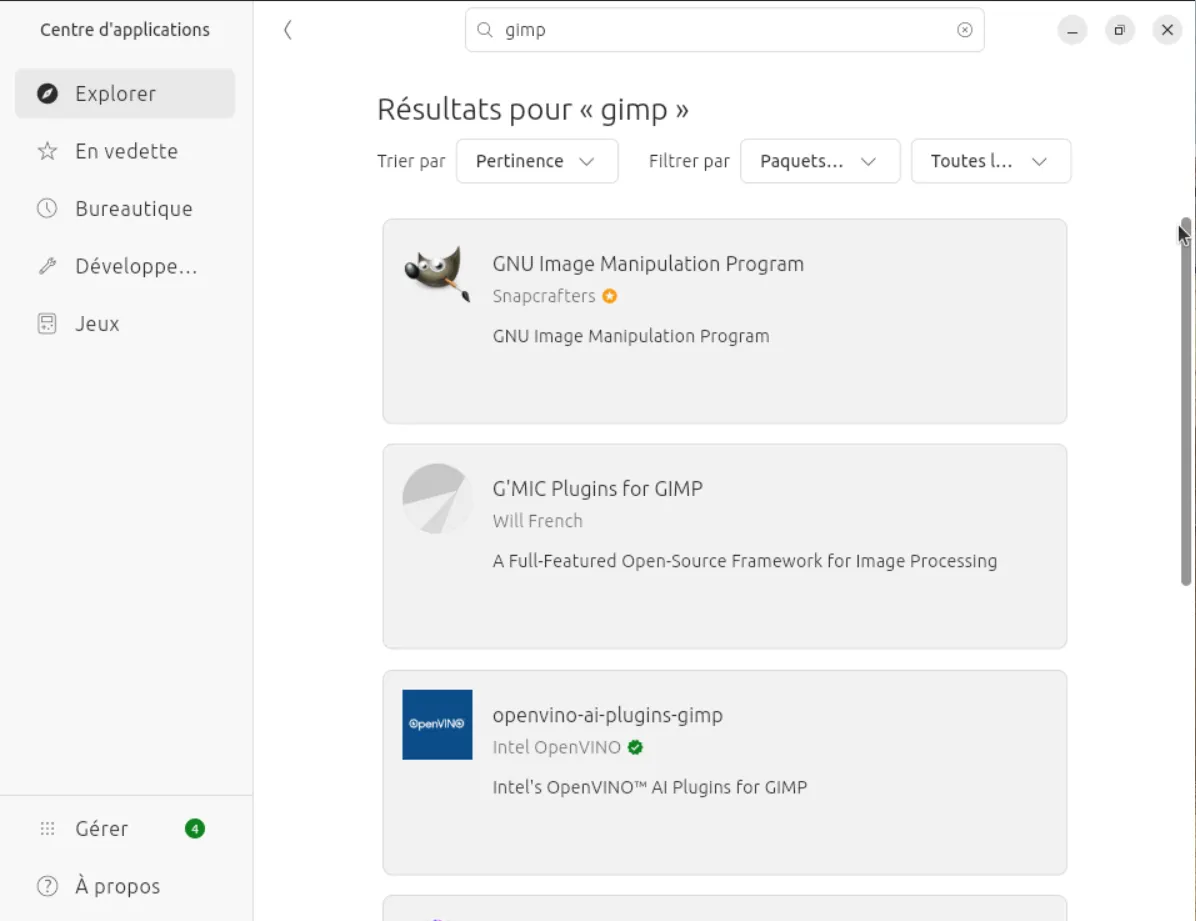
For example, searching for GIMP lets you find the free alternative to Photoshop and install it with one click. You will also find LibreOffice, VLC, games and thousands of other applications.
3. The Ubuntu file manager
The file manager lets you browse your documents, pictures, videos and downloads. Every user has a Home folder containing organized directories such as Documents, Music and Pictures.
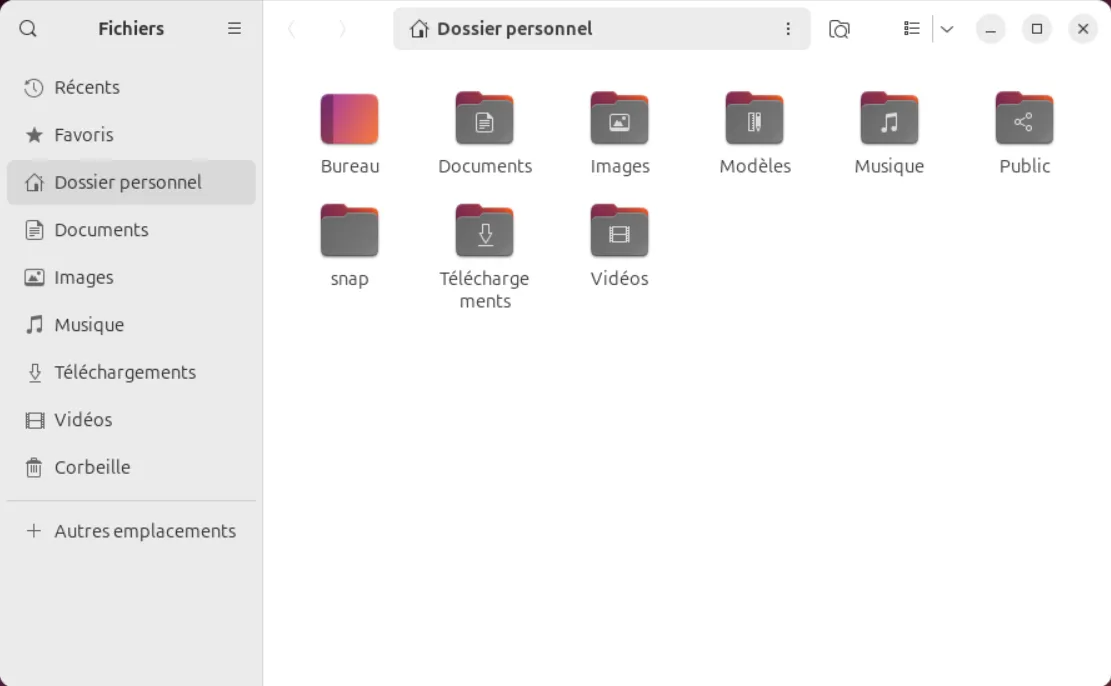
The logic is similar to Windows File Explorer, making it easy for new users to get started.
4. The terminal
Ubuntu offers a powerful terminal for users who want to stay in control. Although almost everything can be managed through the graphical interface, some commands can be faster.
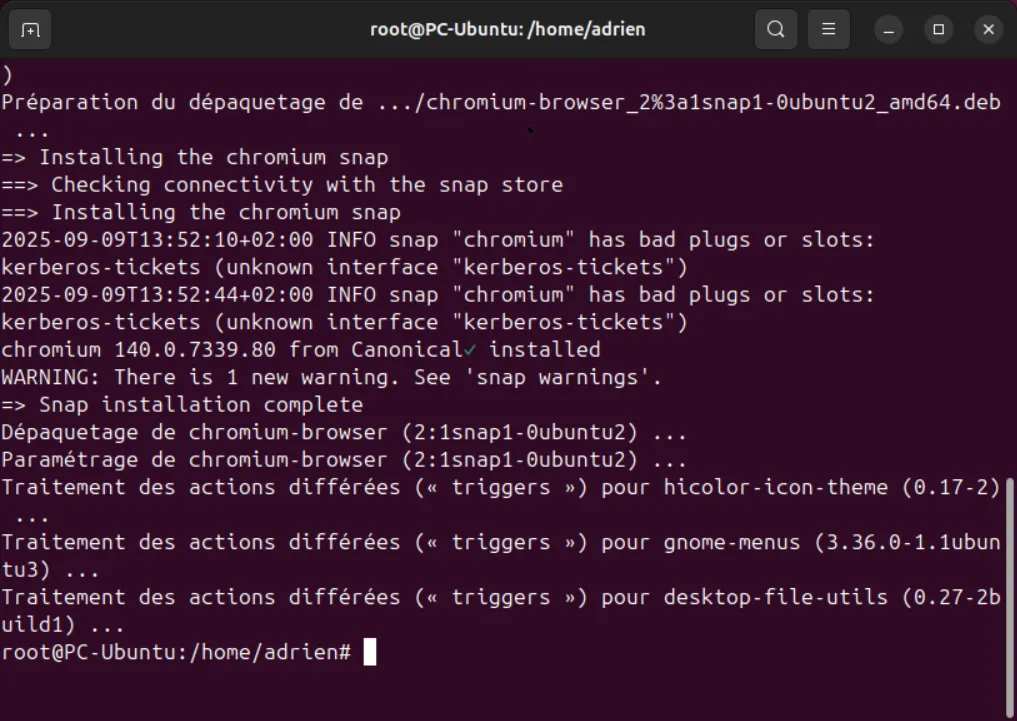
If the terminal intimidates you, do not worry: most everyday tasks, such as browsing, installing software and managing files, can be done without touching it. It remains an essential tool for advanced users.
From Windows 10 to Ubuntu: what to remember
Installing Ubuntu instead of Windows 10 is not complicated if you follow the steps in order: prepare the PC, create a bootable USB drive, start the installation and configure the system. In just a few minutes, an old computer or one that is not compatible with Windows 11 can enjoy a second life.
Ubuntu is a durable, secure and completely free alternative to Windows 10. With long-term support (LTS), regular updates and a large software catalogue, it provides a modern experience for most everyday uses, including browsing, office work, multimedia and even gaming.
If Ubuntu is not quite right for you, there are other interesting Linux distributions: Linux Mint for its simplicity, Fedora for its latest innovations, Arch Linux for its speed or Debian for its stability. The free-software world offers great variety, so everyone can find an environment that suits them.
We allow some readers to view our articles for free with an ad blocker. However, their number is currently too high for us to keep this access available to everyone.
You can disable your ad blocker to continue reading immediately, subscribe to enjoy all our content without ads, or come back a little later when the pressure has eased.
Access will be restored automatically as soon as the situation allows.